Aurora Borealis Trip Planning:
I've always dreamed of seeing the Aurora, especially as a photographer. I live in Austin Texas, so it doesn't get down this far south. So I booked a flight for New Year's week around the new moon, borrowed every coat our friends had (for the minus 33F temps!), and headed to Alaska in the dead of winter. We saw the aurora 6 out of 7 nights, and it got better each night.
I'm still trying to find words to describe the experience. Science met nature. It was incredible, beautiful, spiritual. My heart is so full...
As a note, this trip planning guide is based on our trip to Alaska. We stayed in Fairbanks. Chena Hot Springs Resort is another option—the reviews there are mixed but there’s a lot to do there as an all-in-one location. You might need adjust this guide if you’re in another part of the world.
What is the Aurora?
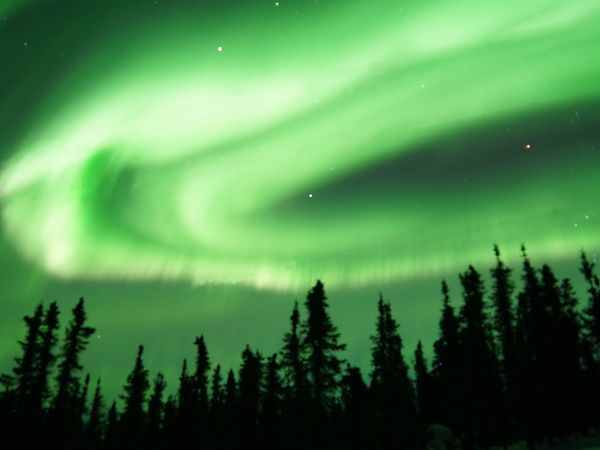
The sun has solar storms which produce solar flares. These electrically charged particles stream into space on solar winds, colliding with Earth (and other planets). These charged particles are deflected towards the north and south polar regions by the magnetosphere, a shield that protects the Earth from space weather. When these particles interact with the gas molecules in our atmosphere, the electrical charge excites those gases, causing them to give off that energy as light. Oxygen gives off green (low altitude) and red (high altitude), while nitrogen gives off purple.

When is the best time to see the Aurora?
The sun’s solar storms go through an 11 year cycle of intensity. The 2024-25 winter is a solar maximum year, and the next peak will be 2035-36. The 2-3 years around these dates should still be great viewing. You will also need dark, clear skies. While daylight hours are shorter from Sept through April, winter (Dec-Jan) tends to have the darkest, clearest skies. When planning a trip, look up when the new moon occurs and start with that at the middle of your travel dates, as a full moon produces a lot of light pollution. The darkest skies occur between 10pm-3am. Check the forecast for lack of clouds and plan to be up and outside at that time each night to maximize your chances. Lastly, how long should your trip be? Statistically, if you view the skies in these conditions for 3 clear nights, you have a 90% chance of seeing the aurora (more on peak years, less on trough years). We went in 2024-5 for 7 nights and saw the aurora on six of them—we didn’t want to take chances on missing it. That might have been overkill—5 nights seems about right for most people.


Where should I go to see the Aurora?
The Aurora Borealis is best viewed directly under the aurora ring. Fairbanks Alaska, Northern Canada, Lapland (Finland, Norway, Sweden, and Northern Russia) are all prime viewing locations. The Aurora Australis is best viewed from Antarctica, New Zealand and the Southern parts of Australia, South Africa and Argentina.
In Fairbanks, you’ll have three options: a guided tour, a paid sheltered viewing location, or a free viewing vantage point.
Guided tours cost a lot per person. Quality varies tremendously—read reviews before booking. But your guide will pick you up at your hotel and drive you to a location, where you will likely wait in the vehicle until the aurora comes out. The guide may also teach you about the aurora, photography, etc. Note that you will not get a refund if you don’t see the aurora, and you typically book these too far in advance to get an accurate weather forecast. We decided this was too cost prohibitive for us, although we met people who liked this option—these started at $300-$500pp.
There are several sheltered viewing locations. You drive to a location with a good view, a warm building with hot beverages and cookies (and a bathroom) to wait inside for the aurora. Some have a host who teaches about the aurora and photography (host quality varies). These cost around $40-50pp and, just like the tours, there are no refunds, although many can be booked same day (so you can check the weather forecast first). We did this a lot: here are our favorites (no affiliation). Note that many of these have a paid shuttle pickup option from Fairbanks hotels, but we found driving ourselves fairly easy.
-
Aurora Pointe: Chena Hot Springs Road, 15mins from Fairbanks. Formal presentation, outdoor campfire, family pics, warm drinks, cookies. You will sometimes share this facility with tour groups. Good clearing to the North, West and South. $50pp.
-
Aurora Borealis Lodge: Cleary Summit, 30mins from Fairbanks. Small group, intimate setting, friendly host, warm drinks, cookies. Good clearing to the North. $40pp adults, $20pp children.
-
Borealis Base Camp: Past Cleary Summit, 40mins from Fairbanks. High end resort and crowd. Clearing to the North, but expect to see resort “igloos” and associated light on the horizon—interesting foreground in your photos but it can get old. Walk back down the driveway for a clearer view. Warm drinks. The $50pp viewing package was not offered this season. The $99pp package included a 3 course dinner. We splurged once for New Year’s Eve, and the food was fabulous.
If it seems a little extravagant to pay this much to look at the sky, there are several well-known vantage points that are completely free. These large parking lots in clearings with no buildings (or bathrooms)—you will drive there and wait in your car for the aurora.
-
Creamers Field—located in the north end of town. A wildlife refuge with a big clearing.
-
Murphy Dome—25mi/40mins from Fairbanks. Highest altitude vantage point.
-
Cleary Summit—20mi/30mins from Fairbanks. Multiple lots with good views.
-
North Pole/Chena Lake Recreation Area—23mi/35mins from Fairbanks. Park with views over the water.
-
Chena River State Recreation Area—essentially all 56mi of Chena Hot Springs Road, starting 4mi from Fairbanks and going all the way out to the Resort. Multiple scenic pullouts, primarily in the campgrounds.

How do I photograph the aurora?
If you are using your phone, set it to night mode and shoot with a steady hand. If you are using a 35mm camera (or using a phone on manual settings), you will need a tripod for long exposures—it is not possible to hold a camera motionless by hand. Learn how to set your camera before your trip, but bring a headlamp with a red light (so you don’t mess up your/other’s night vision) for adjustments.
-
Timer set to 2 seconds (or use a remote) to avoid camera shake when pressing the button.
-
Focus set to manual and turned to infinity. Confirm through the viewfinder by looking at a star (you have sharp focus when you no longer see a double image).
-
Aperture set to wide open to let in as much light as possible.
-
ISO set to 1600. Play with this for better light sensitivity but avoid noise (graininess).
-
Shutter Speed set to 5-10 seconds. Play with this to get the skies dark but the aurora bright.
-
Composition: Try to include some foreground for perspective: a treeline or snow field etc.
-
Video: It isn’t possible to shoot high quality video except during the brightest auroras. Most “videos” are really time lapses. To achieve this, find a good exposure, eg. 5 secs, shut off the timer and set your camera to shoot continuously back to back. You can then “stack” the images in your video software and adjust the playback speed until it looks seamless. Or you can manually add them back to back as video clips, shortening each clip and increasing the playback speed to look seamless.
-
Editing: Start with increasing contrast to darken skies and brighten colors, but use this in moderation. I’ve found that slightly increasing the brightness and exposure settings are helpful after that, but you’ll probably have to lower shadows to compensate. Be careful with your color saturation to keep your skies looking real. If you managed to shoot video, adjust the playback speed—typically 2-5 times normal speed—until you’re pleased with your video.
What can I do during the day?
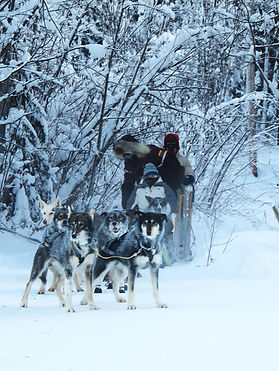
This is a good time for some strategic napping. But there are a lot of activities in the area. Some of our favorites were riding snow mobiles (snow machines), dog sledding, visiting w/ reindeer and soaking in the Chena Hot Springs (such a novel experience in winter, and they also have a neat ice museum). Other activities in the area (that we didn’t try) include snow cat tours, skiing, fat tire bikes, flightseeing, and making long (or overnight) trips to Denali National Park or Castner Glacier. But don’t fill your days with activities—the daylight is short and you’ll want to nap in the morning and again in the afternoon before being out all night.